Friday, June 6, 2014

Mounting the Motor on the Long Bike

Through the process of cleaning out the shop downstairs in N51, we unearthed the remains of Longbike- an exciting artifact from back in the first year of the EVT special section of the MIT 2.007 class.  Charles Guan, EV guru and current teacher of the 2.00gokart section, mentions the Longbike and the history of the old EV section on his blog: http://www.etotheipiplusone.net/?p=3035#section3

From Charles' blog, I dug up a picture of the Longbike in its original condition from the class:

Compared to its salvaged state after some time setting around: 

Pretty much the same, although a bit dusty after its hibernation.  As my experiences in the AIBD class have made me determined to never let a good (or bad) bike go to waste, I took it upon myself to revive the Longbike and bring it back to its glory days!  It definitely had an interesting geometry, and I was curious to see what we could do with it.  

When Jack, the shop manager in D-Lab who first got me into the bike hacking scene, saw this bike, he couldn't get over the ridiculousness of how it was set up.  He got a real kick out of how low the seat was, saying that we'll have to get a pair of motorcycle racing pants and move the pads from the knees to your butt so that it doesn't drag on the ground and so that you look like a baboon while riding it.  This has discussion has led me to always refer to it from now on in his presence as the Ass-bike....  

Here Austin tries to get used to balancing on the unconventional bike geometry:

Jake (my fellow EVT UROP for the summer) and I have been trying to test out some different motor setups and controller combinations that we can use to teach new members in the fall about how EV systems work, so we figured we'd throw something on the Longbike to see how it runs.  I ended up going with just a basic, brushed DC motor controller rated for 24v and 40amps.  I used that to run the motor from an eGO Cycle2 (24v DC, 2HP).


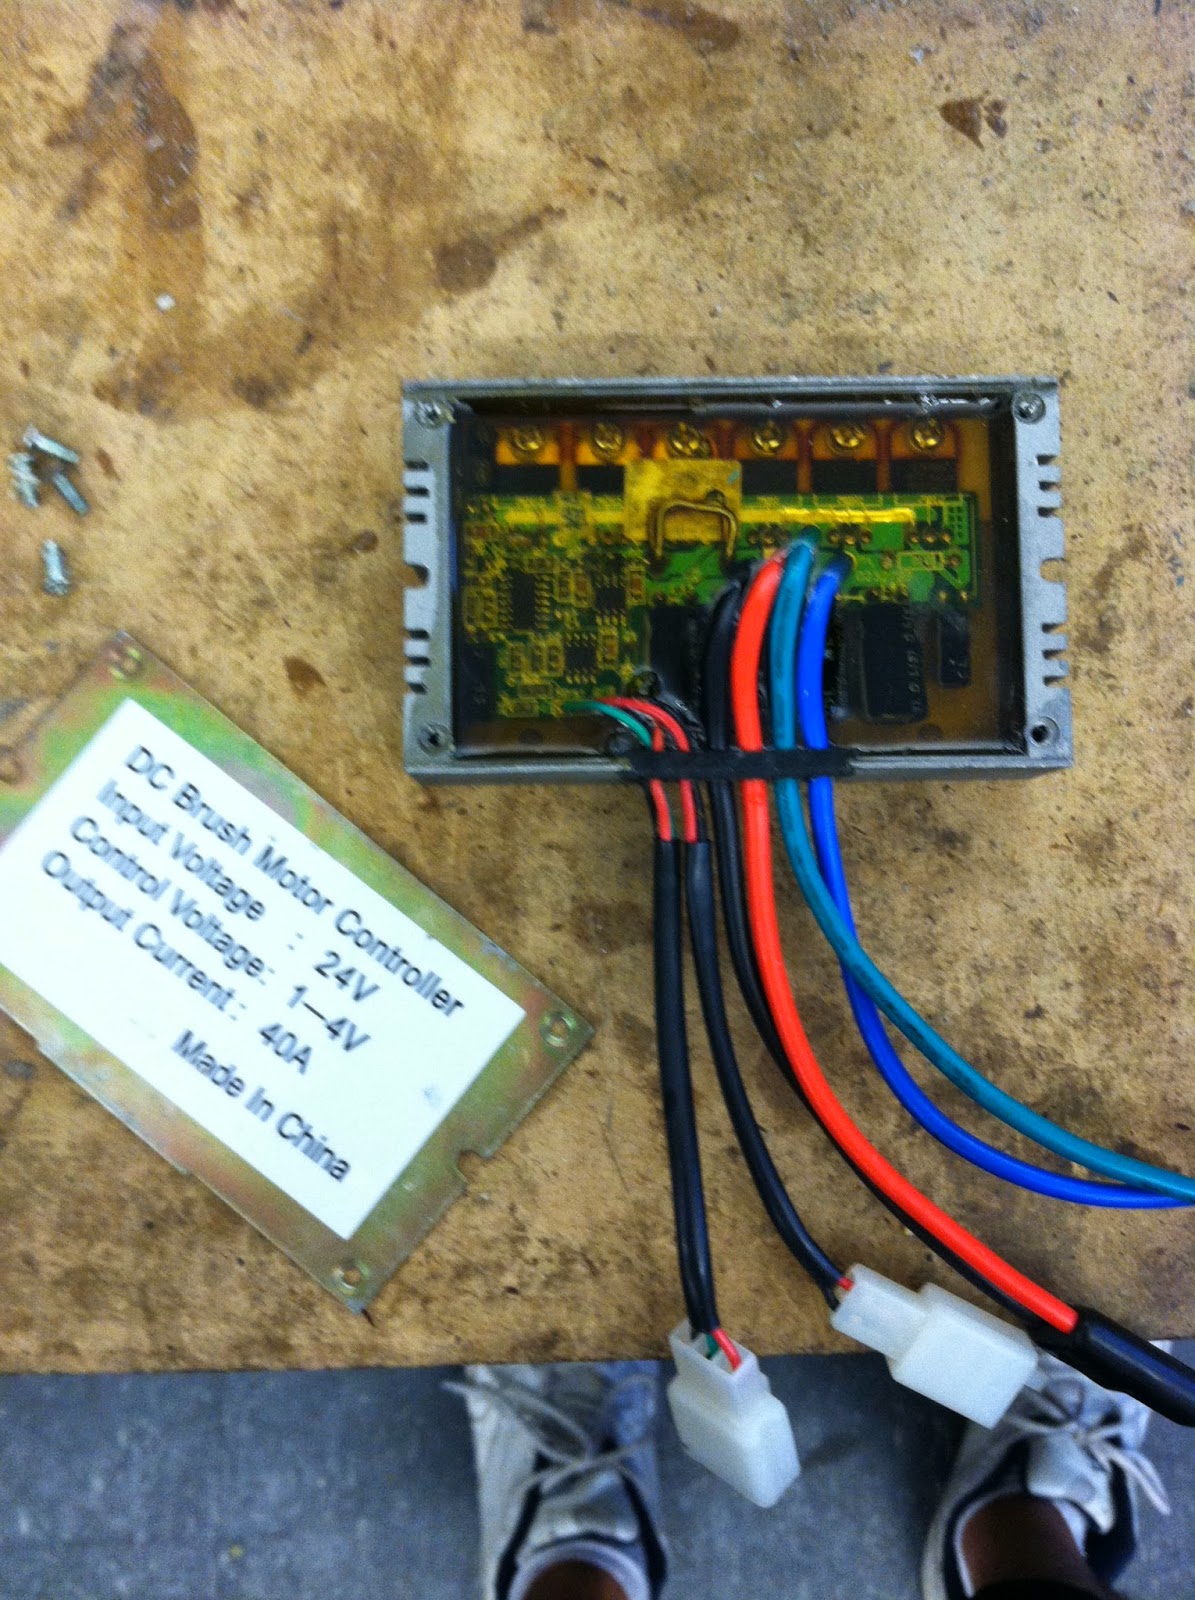
We made an 8S2P battery pack using the 3.3v LiFe cells to power the 24v system, then I just had to mount the motor.  


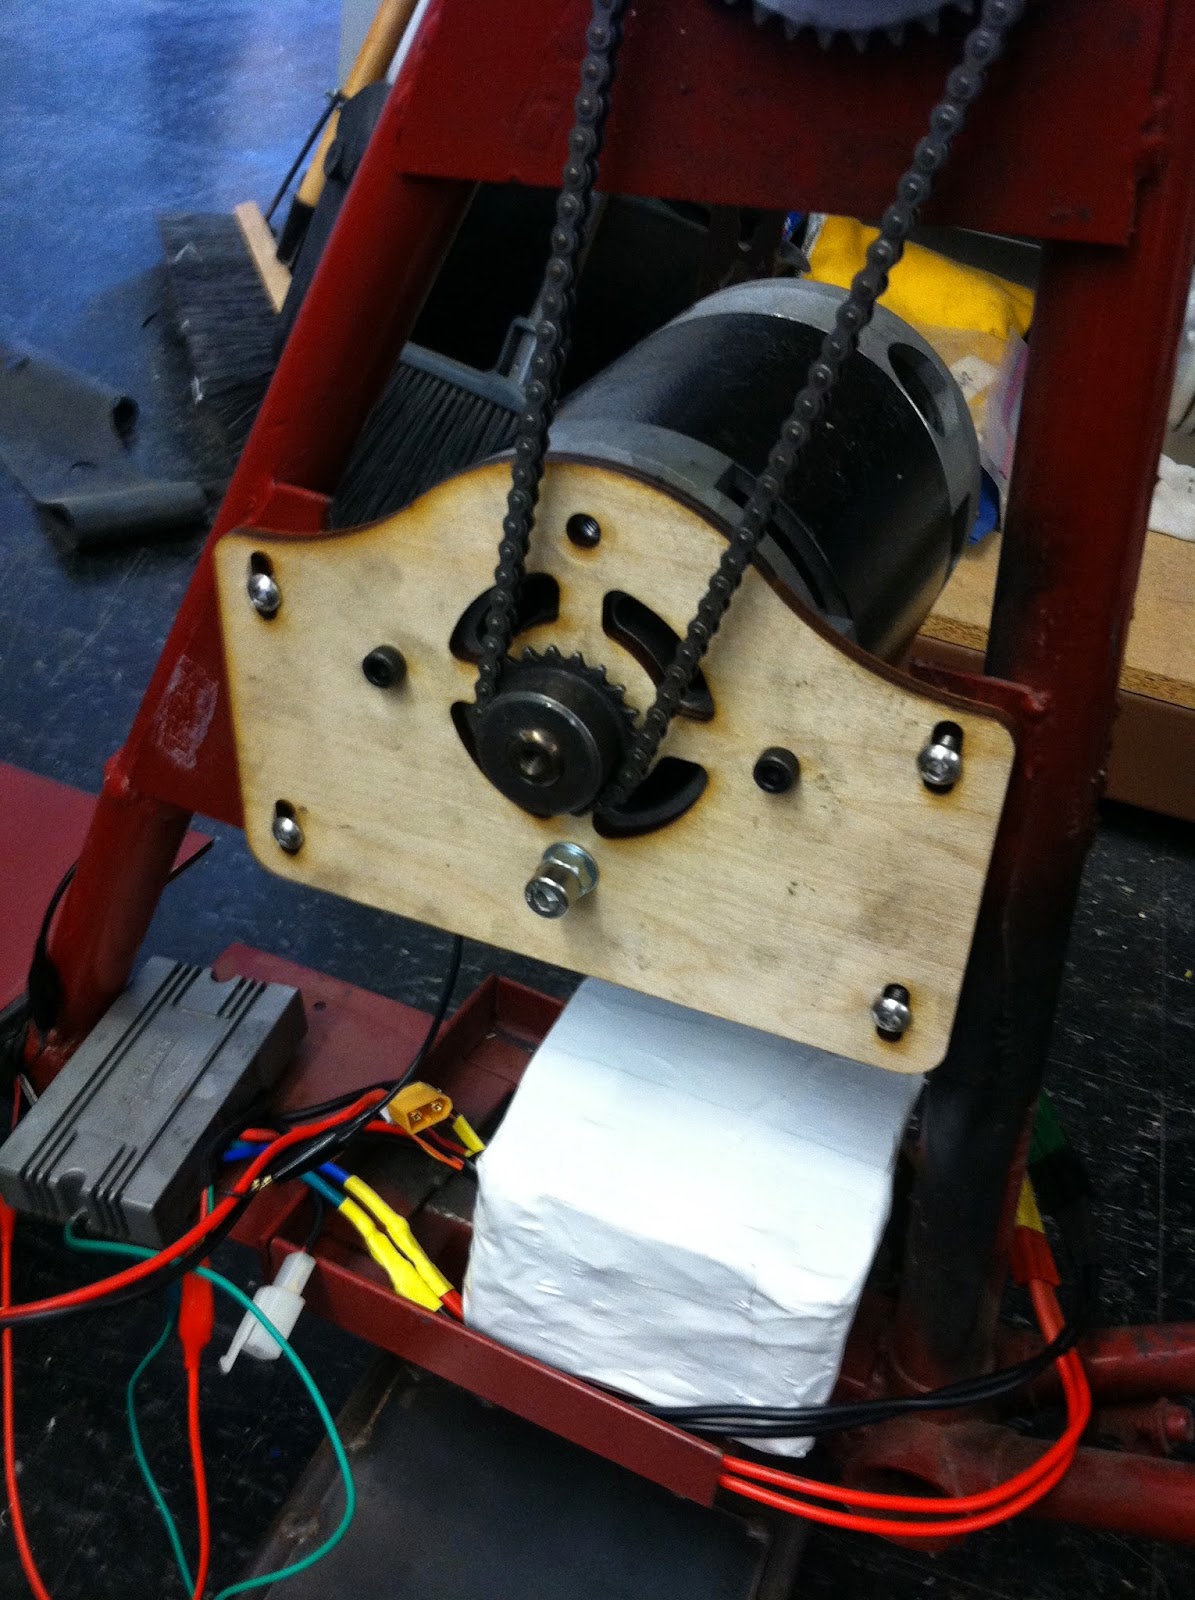
I used the laser cutter to quickly mock up a mounting plate for the motor, with just the bolt hole pattern, openings for the fan and axle, and slots so that it can slide to tension the chain.  Then I quickly cut out the original plate to make room for the motor, leaving enough of the plate on the outsides to drill 4 holes to which the motor mount could be bolted.  


Then I just had to add a sprocket to the motor shaft to connect with the intermediate axle above the motor that is used to compound the gear ratio.  I found an appropriately sized sprocket to give me about an overall 8:1 gear ratio, and finally got to use the new equipment in the shop to open up the hole such that it fit on the shaft and then add a setscrew.

Then I just bolted everything all together, and the slots on the motor mount fit appropriately so that the size 25 chain was easy to tension.  I've been meaning to make a more substantial mounting plate, but for now the wooden version has been holding up well enough through all the testing!


Then once we had everything mounted appropriately...I realized that I had an extra hub motor! And what could possibly be better for the bike than 2 wheel drive??? So the 27" brushless hub motor is only rated for 36v and 250w, which is perfect for the Chinese ebike controller that I had been using on the drift trike.


As much as it hurt me to pull the controller and batteries out of the spaghetti mess of wires inside the drift trike, it'll finally force me to get a better controller for the drifter.  Plus, the hub motor ended up looking pretty good on the front of the Longbike.  We connected the throttle signals together so that the one throttle controlled both the front and rear motors at the same time, giving this bike record out of all the bikes I've made of the most power for the least stability.


Then that was the final setup, a slightly ridiculous combination of 2 controllers (brushed & brushless), 2 battery packs (24v & 36v), and 2 different motors.  Between the steep angle of the head tube and the position of the rider, it was fairly difficult to ride in this state and gave Jake some trouble as he raced up and down the hallway.


Wednesday, June 4, 2014

Summertime with the MIT Electric Vehicles Team!

I can't believe that I haven't posted anything since January, but I'm going to get back to regular blog posts about my projects and catch up on everything that's been going on! It's been a busy 5 months, but now I'm done with another semester and getting ready for a summer of research with the Electric Vehicles Team!

We had a very productive semester with the team including a successful trip to Providence on our electric trike and recently the crew got the converted electric 1976 Porsche 914 registered and road legal! I'll be sure to post all the work we do for the summer, and definitely check out the team blog and website!!!

http://www.mit-evt.blogspot.com/
http://web.mit.edu/evt/

Sunday, June 1, 2014

Lions and Tigers and Bears, Oh My!

Having a lot of project based classes this semester made for a quick round of final exams this semester, and I was soon back at home in the sticks.  Yet during finals week, there was some commotion back home as the family informed me that the chickens were under attack.  Dad had gotten them for eggs, but once my sisters gave all of the chickens names, we've come to think of them as more of our pets and such problems are regarded as a bit of a big deal :)

Image and video hosting by TinyPic

So it appeared that the chicken coop had been facing an intruder, and a single chicken was taken from the coop two nights in a row.  The white fence in the picture below got completely ripped open from the top to the ground.  It's tough to see it in this picture since I took it after my dad and sister had already covered the hole with a couple layers more of the black vermin wire.  The chicken coop has its own door in the back, which opens in the back out into a small area that is fenced in on all sides as well as the top and opens at a gate to let the chickens out.  What happened that night was that the door to the chicken coop was left open, and although the gate of the fence was all closed up, something was able to rip through the fence and take one of the chickens.
The Mended Fence
The gang reinforced the fencing and had the chicken coop on lockdown the next night, seemingly ready for deterring whatever might come back again from the previous night, only to find out the next day that something had ripped the entire wall of the coop with the chickens' nesting boxes right off and taken another chicken.  
                                   

The next night there were no problems in the chicken coop, and when I got home from school the next day, we set up the trail/game cameras.  The fam had been watching a lot of the show "Finding Bigfoot" on Animal Planet lately, so they knew the drill haha.  There was never any shortage of wildlife in the rural area in which we live, and the game cam had picked up all sorts of deer, foxes, raccoons and such in the past, but we were interested to finally find out what could have possibly done that kind of damage to the chicken coop.  

Image and video hosting by TinyPic

Image and video hosting by TinyPic

Image and video hosting by TinyPic

Image and video hosting by TinyPic

The investigation continued with raccoons being the primary suspects, as they were known to frequently kill chickens and had regularly been around our property, such as the one in the picture above stealing birdseed from the feeders at night.

Dad and I threw together a quick trap using scrap wood and covered with that black vermin wire.  Basically, it's set up so that there's a door hanging above the entry and when a creature enters and goes to eat whatever food is on the inside, it bumps the dowel with the pin holding up the door so that it slams down behind him.  With an 18"x18" opening, it was big enough to catch a pretty sizable raccoon.  

Image and video hosting by TinyPic


I don't know if it was the long winter finally ending and letting every creature of hibernation at once, but we had a wide variety of all different raccoons and foxes caught on the camera at every hour of the night, such as the raccoon below at 4 in the morning.  The chickens remained unharmed for several days though and it appeared that the nighttime critters on camera were only there for the apple, peanut butter, and chicken wings that we left as bait rather than trying to kill the chickens.


We had caught a couple of them one day, but they had managed to overcome our efforts to trap them by biting through the wire and squeezing through a narrow opening between the wooden slats.  The fact that the raccoons were able to break through the trap so easily seemed to indicate that they would also have been able to break in through the chickens' fence just the same, although nothing had been bothering the chickens since.

Image and video hosting by TinyPic

Then one week after the first chicken had been abducted, the game cam picked up something much larger than just the raccoons....

Image and video hosting by TinyPic

Image and video hosting by TinyPic


Monday, April 14, 2014

EVT: Brakes

I've been doing a lot of work on the Electric Vehicles Team throughout the semester, and one project that I've been working on has been mounting the motors to actuate brakes on our trailer.  


We're still working on our big trike project, in which we're trying to go from Boston to New York on a single charge in our converted, electric powered Greenspeed tricycle towing a trailer with 300 pounds of batteries.  For information on the complete project, check out our blog! 

With the 300 pounds of batteries on the trailer, we definitely wanted to add some emergency brakes to the trailer wheels.  Last summer, the team mounted a standard set of bicycle rim brakes to the wheels.  After a certain amount of debate and experimentation, we decided that electric brakes would be more practical than running brake cable from the trike to the trailer for mechanically actuated brakes. 

We stuck with the car window motors that we found in the shop after being unable to find a solenoid or other alternative that could offer the amount of power that we needed.  Their worm gear drive makes them very powerful, as well as being unable to be backdriven, which is a helpful feature for pulling the brake cable.  One downside to using them was just that they had very irregular shapes, which made them slightly inconvenient to mount.  The position of the motors below the trailer also caused orienting them to require a lot of consideration so that there was still sufficient clearance with the ground.  We also didn't have symmetric models, meaning that we needed to have separate mounting plates for each side.   


I started mocking up some mount ideas by just laser cutting some crazy shapes out of MDF to find an optimal way of fitting them up under the trailer.  As with the suspension and everything else we've attached to the trailer in the past, I mounted it by compressing it between plates and squeezing it up against the trailer frame as opposed to drilling directly into it.


I tried to make the mounting plates fit the angle of the angle iron that attached the rim brakes.  I ended up going with a 3 plate sandwich sort of setup in which I made the back plate holding the angle iron larger, and compressing the trailer frame box tube between that and a second plate to which the motor was attached, and then squeezing the motor between that second plate and a smaller third plate.  The only problem was that because of the asymmetry, I could only fit 2 hex bolts through all 3 mounting plates on the right side as opposed to 4 on the left, but it seems like the 2 fewer bolts does not sacrifice the structural integrity of the mount.  Here's what the final waterjetted aluminum plate configurations looked like:


Left Side Brake Motor


Right Side Brake Motor

The EE team had steadily pushed forward through all of the work with controlling the motors, and you can see the plans of the custom electronics for the brakes on our EVT blog.  Here is a video of Rango demonstrating the firmware.


The only major problem once the brakes were mounted was that they were drawing too much current, which was solved by just adding another DC to DC converter to power them.


Weatherproofing/Paint:

Although we didn't use the brakes on our way to Providence, they were securely mounted for the duration of the trip.  The mounting held up fine, but the elements did a number on the exposed steel surfaces of the angle iron mounting plates and parts of the motor.  A much needed cleaning and spraying with the rust restore, primer, and black spray paint cleaned everything up pretty nicely, and now the black finish matches the black bar over the wheels on the trailer.


Monday, March 17, 2014

EVT: Providence Trip

We've all been doing a lot of EVT work lately to prepare for this big test run! We finally made the journey to Providence last weekend, here's the recap from the blog!

The Team at Brown University
The team took another big step toward the New York trip with our milestone test run to Providence last weekend!  In just over 5 hours of travel, Mark Jeunnette rode the trike/trailer combo all the way from the N52 shop to Brown University in Providence, Rhode Island!


We prepared for the big trip with some important testing and fine tuning the week before.  We made some final adjustments and tested out the running trike/trailer combination through the halls of the IDC.  This successfully proved that all of the controls were working properly...and that the trike was indeed faster and handled better than the mobility scooter.  


After we made sure that all of the equipment indeed fit inside of Erich's truck, Mark got to take the trike out for some more road testing as well to make sure that all of the systems and regen were working properly.  The trike held up well after a long set of laps through the parking lot, although we eventually encountered a problem in which the contactors would not remain closed.  Although it seemed alarming, the problem was quickly identified as a bad connection and corrected back in the shop.  Overall it was a very productive day of testing.


The Big Day


The Crew at N52 before departure
 March 15 was the big day, and we were all ready to go, planning to get everything packed and ready to go at 6am and on the road by 7 so that we could be out of the city before traffic got too hectic.  The weather didn't quite cooperate though, and some light rain in the early morning delayed our departure.  Fortunately it wasn't enough to cancel the trip, and gave us all a chance to head up to Harvard for a quick IHOP breakfast as a team before loading up the truck.  


 After getting situated in the N52 parking lot, we were good to go! Mark drove the trike with Erich and Alex rolling in the pickup truck, and I drove the minivan with Roberto, Joey, Jacob, and Eric.  We followed directly behind the trike to watch out over Mark, and Erich left later with the truck.  The roads were a little bit slick to begin, but we made it out of MIT just fine, with everyone on the sidewalks pointing and cheering for Mark as he drove by.


After about an hour of driving, we stopped at Stonybrook Plaza in Roslindale to check in and tighten up some screws and grab some snacks while we were there.  Roberto made sure to point out and take a picture of the notorious telephone pole that we hit with the truck when attempting the Providence trip last year.  This spot in Dedham was the farthest Lennon made it on the ebike before the hub motor burned up:


The trike was handling well and making great time, although we had to make a quick, unplanned stop when one of the flags flew off and Roberto had to go running after it. 


Mark also had to pull over just before noon after encountering a problem with the throttle.  It proved to be minor, and was fine once the controller was reset.  Yet, when we opened up the fairing, we noticed another problem in that the wheels were kicking up all the dirt, mud, and salt into the fiberglass enclosure and making a mess of the inside of the trailer.  We quickly cleaned off the dirt from the electronics as best as we could and temporarily solved the problem by covering the trailer with rags and tshirts inside of the fairing.


We were quickly back on the road and back to passing people who were just riding normal bicycles, until we hit another snag just after we crossed into Rhode Island at 1:15 and were stopped by the cops.  With the minivan following the trike at 20 mph, we started really backing up traffic when we reached narrow roads.  The policeman definitely had some questions about the trike and what we were doing with it, as well as safety concerns.  After a brief conversation, we were all set to continue the voyage, but with both the truck and the van leading the trike and periodically waiting up for Mark.


At 2:30 we finally reached Providence, and headed over to Brown to meet up with Roberto's cousin and some of our friends who attend school there.  It was an exciting 5 hours of travel, and the trike held up well as it rolled on in to the Brown campus.   


After some burgers, milkshakes, and a tour around the campus, it was time to pack it all up into the truck and head back to Cambridge.  It was a fun and exciting trip, but none of us had the energy or enough sun left in the day to ride the trike back over to MIT.  The few extra unplanned stops pushed the trip just over 5 hours and ended up being 51.84 miles, in which we used 30% of our battery pack.  It was definitely a successful adventure, although at that rate it'll be cutting it close trying to go the entire 200+ miles to New York City.  We've got some refinement and work left to do, but we're hoping to make the necessary adjustments and embark on the New York trip soon!